Moldy Cupcake Free Crochet Pattern
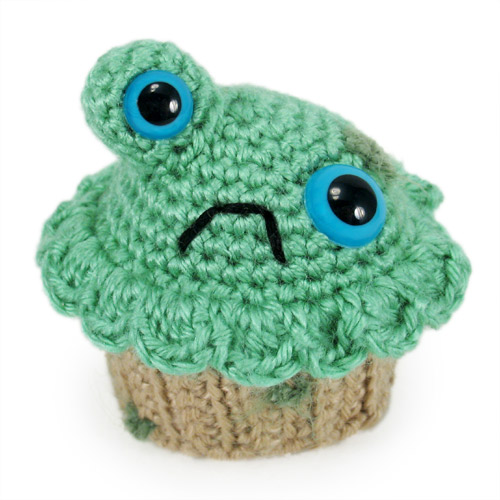
You’d have to be a long time follower of mine to remember the moldy cupcake! I originally published this pattern in 2007. But I took it down to revise it a little bit. And now it’s back! Ever wonder what happens to all those cute cupcakes when they get old? Now you know! ;)


● Size E crochet hook
● Yarn needle
● (1) 12mm safety eye
● (1) 15mm safety eye
● Stuffing
● Piece of cardboard (to hold the shape of the bottom)
● Embroidery Floss & Needle for the mouth
● Green Hairy Yarn for mold
● Worsted Weight Yarn in Tan (CA) & Green (CB)
Yarn used in example:
Caron Simply Soft in Bone (CA) and Sage (CB)
Moda Dea Dream in Leaf for the mold

ch – Chain
sc – Single Crochet
dc – Double Crochet
ea – Each
lps – Loops
rep – Repeat
FO – Finish Off
sl st – Slip Stitch
CA – Color A (bottom)
CB – Color B (top)

TOP
With CB, ch 2.
rnd 1: 6 sc in 2ndch from hook. (6)
rnd 2: 2 sc in ea st (12)
rnd 3: [1 sc, 2 sc in next st] rep around (18)
rnd 4: [2 sc, 2 sc in next st] rep around (24)
rnd 5: [3 sc, 2 sc in next st] rep around (30)
rnd 6: [4 sc, 2 sc in next st] rep around (36)
rnds 7-9 (3 rnds): 1 sc in ea st (36)
rnd 10: (1 sc, 3 dc in next st) rep around
Make an invisible join to finish and leave a piece of yarn long enough to attach the top to the bottom.
EYE
With CB, ch 2.
rnd 1: 6 sc in 2ndch from hook. (6)
rnd 2: 2 sc in ea st (12)
rnds 3-5 (3 rnds): 1 sc in ea st (12)
FO leaving a piece of yarn long enough to attach to the top.
BOTTOM
With CA, ch 2.
rnd 1: 6 sc in 2nd ch from hook (6)
rnd 2: 2 sc in ea st (12)
rnd 3: [1 sc, 2 sc in next st] rep around (18)
rnd 4: [2 sc, 2 sc in next st] rep around (24)
rnd 5: [3 sc, 2 sc in next st] rep around (30)
rnd 6: [4 sc, 2 sc in next st] rep around (36)
Make an invisible join and FO
*trace shape onto a piece of cardboard and cut out*
SIDES
With CA, ch 9. 1 sc in ea st starting in 2nd ch from hook (8)
row 1: turn, ch 1, 1 sc in ea st working in back lps only (8)
row 2: turn, ch 1, 1 sc in ea st working in front lps only (8)
rep rows 1 and 2 until you have completed 31 rows total.
ASSEMBLY
Bottom: The side with the lps showing is the right (out) side. Put the last row behind the first and stitch them together using your yarn needle. Next, stitch the bottom piece to the side piece. Put the piece of cardboard you cut out into the bottom to hold the shape.
Eye & Top: Place the 12mm safety eye between rnds 3 & 4 of the eye piece. Stuff it as much as you can and attach to the top piece using your yarn needle and the piece of CB that you left. Attach the 15mm safety eye to the top. Refer to the picture for eye placement help.
Embroider a mouth. Then, using your hairy green yarn and yarn needle, stitch several patches of mold on the top and bottom pieces wherever you like.
Top & Bottom: Using the piece of CB you left, attach the top to the bottom. Make your stitches right behind the row of dc’s on the top piece. Stop to stuff before stitching completely shut.

If you use this free pattern, please consider supporting me by purchasing a pattern from my shop. Your support will help ensure that I’m able to continue making new patterns to share. Thanks for considering! :)

You are welcome and encouraged to sell any items you make using this pattern! All I ask in return is that when selling online, please credit Julie King / Gleeful Things & provide a link to www.gleefulthings.com.
You may NOT sell the pattern, distribute it in any form, repost it online, or alter it to claim it as your own (this includes charts & translations to other languages). Copyright © 2010 Julie King / Gleeful Things. All Rights Reserved.


I wonder if this can be made on a knitting loom? Would u happen to know?
love the moldy cupcake :) super cute and creative i wouldnt have been able to come up with this