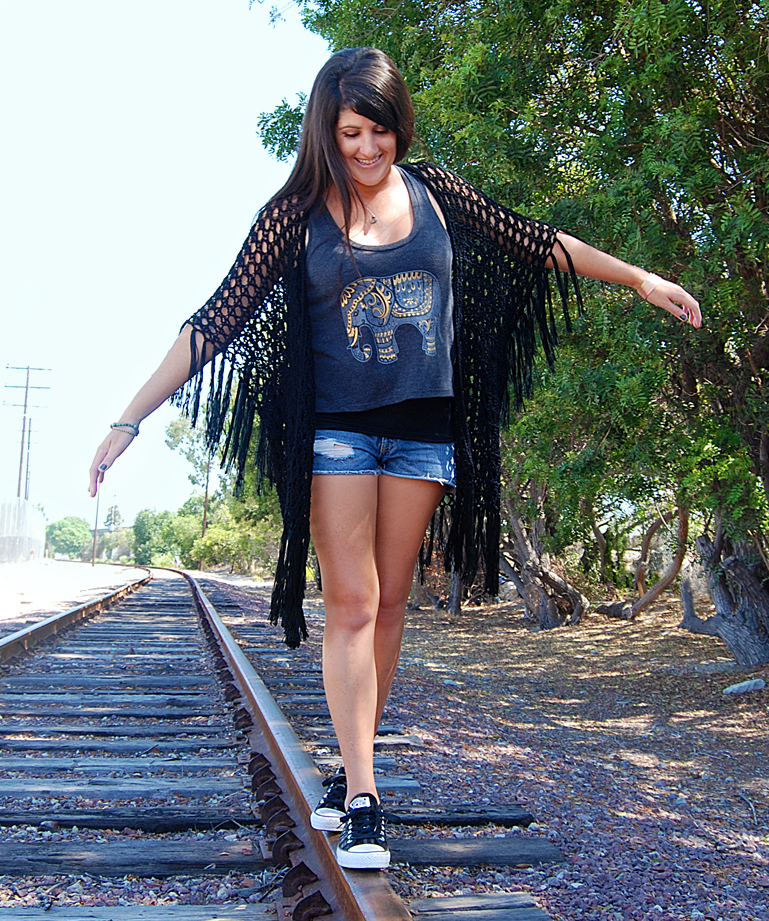
XOXO Kimono Free Crochet Pattern

This kimono is light, open and airy. Perfect for summer nights! It works well with so many outfits and can easily be as fancy or as casual as you like depending on what you wear it with.
The XOXO Kimono gets it’s name from the treble cross stitches it’s made with. This lacy stitch is shaped like X’s and the spaces between them create the O’s!
It can be made with anywhere between a #2 sport weight yarn and a #4 worsted weight yarn. This gives you SO many options when choosing which yarn you’ll use!
This is a very simple garment to make! It’s crocheted as one piece and then the sides are stitched together to create armholes. And despite the large size, it still whips up fairly quickly.
You can easily work on this project in front of the TV or on a road trip because there is only one stitch to learn. I’m sure you’ll love making and wearing this fun, fringey kimono!

Disclosure: This post contains affiliate links. If you click and make a purchase, I will receive a small commission, at no extra cost to you. This, along with the ads shown on this blog, help to ensure that I’m able to continue posting free patterns and tutorials for you to enjoy. Thank you for your support!
Why You’ll Love This Pattern
- Endless yarn options – With this pattern being able to accommodate a few different yarn weights, there are tons of possibilities for yarn choices, allowing you to create a kimono that is uniquely your own!
- Fun to wear – The XOXO Kimono is such a versatile piece that you will love mixing with different outfits! Wear it as a cover up at the beach or throw it over a tank top & denim shorts to add some flair to an easy going, casual outfit.
- Easy to make – The treble cross stitch is fun to work and being so tall, it allows you to whip up this oversized kimono pretty quickly!
Yarn
#2 sport weight yarn – #4 worsted weight yarn: approximately 1200 yards for S/M & 1600 yards for L/XL
Examples use Red Heart Luster Sheen (discontinued) in black and Lion Brand 24/7 Cotton in Silver
This pattern was originally designed using Red Heart Luster Sheen, a #2 sport weight yarn, but because the gauge is so loose, you can actually use up to a #4 worsted weight yarn. Just be sure to check your gauge to make sure your chosen yarn will match.
Yarn Substitute Ideas
Download The Pattern
You can find the FREE pattern by scrolling down. A print-friendly, ad-free PDF of this pattern is also available for a small fee. If you enjoy my patterns, please consider purchasing the PDF – your support is greatly appreciated and will help me keep the new patterns coming! :)

Supplies
- US Size H/8 (5.0mm) crochet hook or size needed to obtain gauge
- yarn needle
- scissors
Difficulty
Intermediate
Gauge
4 trx & 4 rows = 4″
Sizes & Finished Measurements
S/M: 35″ wide & 24″ long
L/XL: 41″ wide & 30″ long
Measurements do not include fringe. Kimono has a lot of stretch to it.
Abbreviations
- ch(s) – chain(s)
- sl st – slip stitch
- sc – single crochet
- yo – yarn over
- tr – treble crochet
- trx – treble cross stitch

Special Stitches
trx (Treble Cross stitch) = yo twice, insert hook into st, yo and pull up loop, yo and draw through 2 loops, yo, skip 2 chs and insert hook into st, yo and pull up loop, yo and draw through 2 loops, (note: the two loops closest to the tip of your hook will be referred to as center loops) yo and draw through 2 loops, yo and draw through 2 loops, yo and draw through 2 loops, ch 2, yo and insert hook into center loops, yo and draw through center loops, yo and draw through 2 loops, yo and draw through 2 loops.
The Ad-free PDF version of this pattern contains a step by step photo tutorial for this stitch.
Terms of Use
You are welcome to sell any items you make using this pattern, in small quantities. Mass production is prohibited. When selling online, please credit Julie King / Gleeful Things by linking to www.gleefulthings.com or tagging @gleefulthings. You may NOT sell or distribute the pattern itself in any form, alter it to claim it as your own, post it online, or create a video demonstrating the pattern.
Notes
- Pattern is worked in rows, starting at the bottom of the back side. You will then create each half of the front side, then fold them down & stitch up the sides to create armholes.
- The ch 4 at the beginning of each row counts as 1 tr.
- Pattern is written in size S/M with size L/XL in [brackets].

Instructions
Back side:
Row 1: Ch 145 [169] (4 count as 1 tr), 1 trx beginning in 5th ch from hook, 34 [40] trx, 1 tr in last ch – 35 [41] trx + 2 tr.
Row 2: Ch 4 (counts as 1 tr) & turn, 35 [41] trx, 1 tr in last st – 35 [41] trx + 2 tr.
Rows 3 – 24 [30]: Repeat row 2.
Front side:
Continuing where you left off on row 24 [30]:
Row 1: Ch 4 (counts as 1 tr) & turn, 14 [16] trx, 1 tr in first part of next trx – 14 [16] trx + 2 tr.
Row 2: Ch 4 (counts as 1 tr) & turn, 14 [16] trx, 1 tr in last st – 14 [16] trx + 2 tr.
Rows 3 – 24 [30]: Repeat row 2. Fasten off after row 24 [30].
Join yarn to the opposite end of row 24 [30] of the back side and repeat front side instructions to create the other half of the front.
Neckline edging:
Row 1: Join yarn to bottom corner, 4 sc around each of the next 24 [30] tr, 4 sc in each of the next 7 [9] trx, 4 sc around each of the next 24 [30] tr – 220 [276] sc.
Row 2: ch 1 (does not count as a st) & turn, 1 sl st in each st – 220 [276] sl st.
Row 3: ch 1 (does not count as a st) & turn, 1 sc in each st – 220 [276] sc.
Row 4: ch 1 (does not count as a st) & turn, 1 sl st in each st, fasten off – 220 [276] sl st.
Finishing/Assembly
Side seams:
Turn kimono inside out (right side is where you can see the top loops of the sts in the edging). To create armholes, use a piece of yarn along with your yarn needle to stitch the front side to the back side. Start at the bottom and stitch the sides together going up 12 [15] rows. Be careful not to stitch too tightly or your sides will bunch up. Fasten off and repeat this process on the opposite side.
Blocking:
The trx stitches like to bunch together width wise so blocking is recommended at this time to get the kimono to stretch out to proper size.
Fringe:
Attach 6 pieces of fringe (16 inches long & fold in half) to the middle of each trx around the bottom of the kimono, to each tr around each arm hole, and to each end of the neckline edging.
Special Techniques
Below you’ll find two photo tutorials that will help you with the fringe for this project.
How to cut a lot of fringe at once (I used an 8×8″ piece of cardboard for this technique)
Share Your Project
I hope you’ve enjoyed this pattern and I would love to see what you made! Please share your photos on social media and tag me @gleefulthings or use hashtag #gleefulthings. Don’t forget to add your project on Ravelry too! :)